Articles / LORQAI
How to Keep the Same Character in AI-Generated Images
Learn how to keep a recurring AI-generated character recognizable across story scenes with a master reference, multi-angle sheet, identity card, and practical prompts.
Introduction
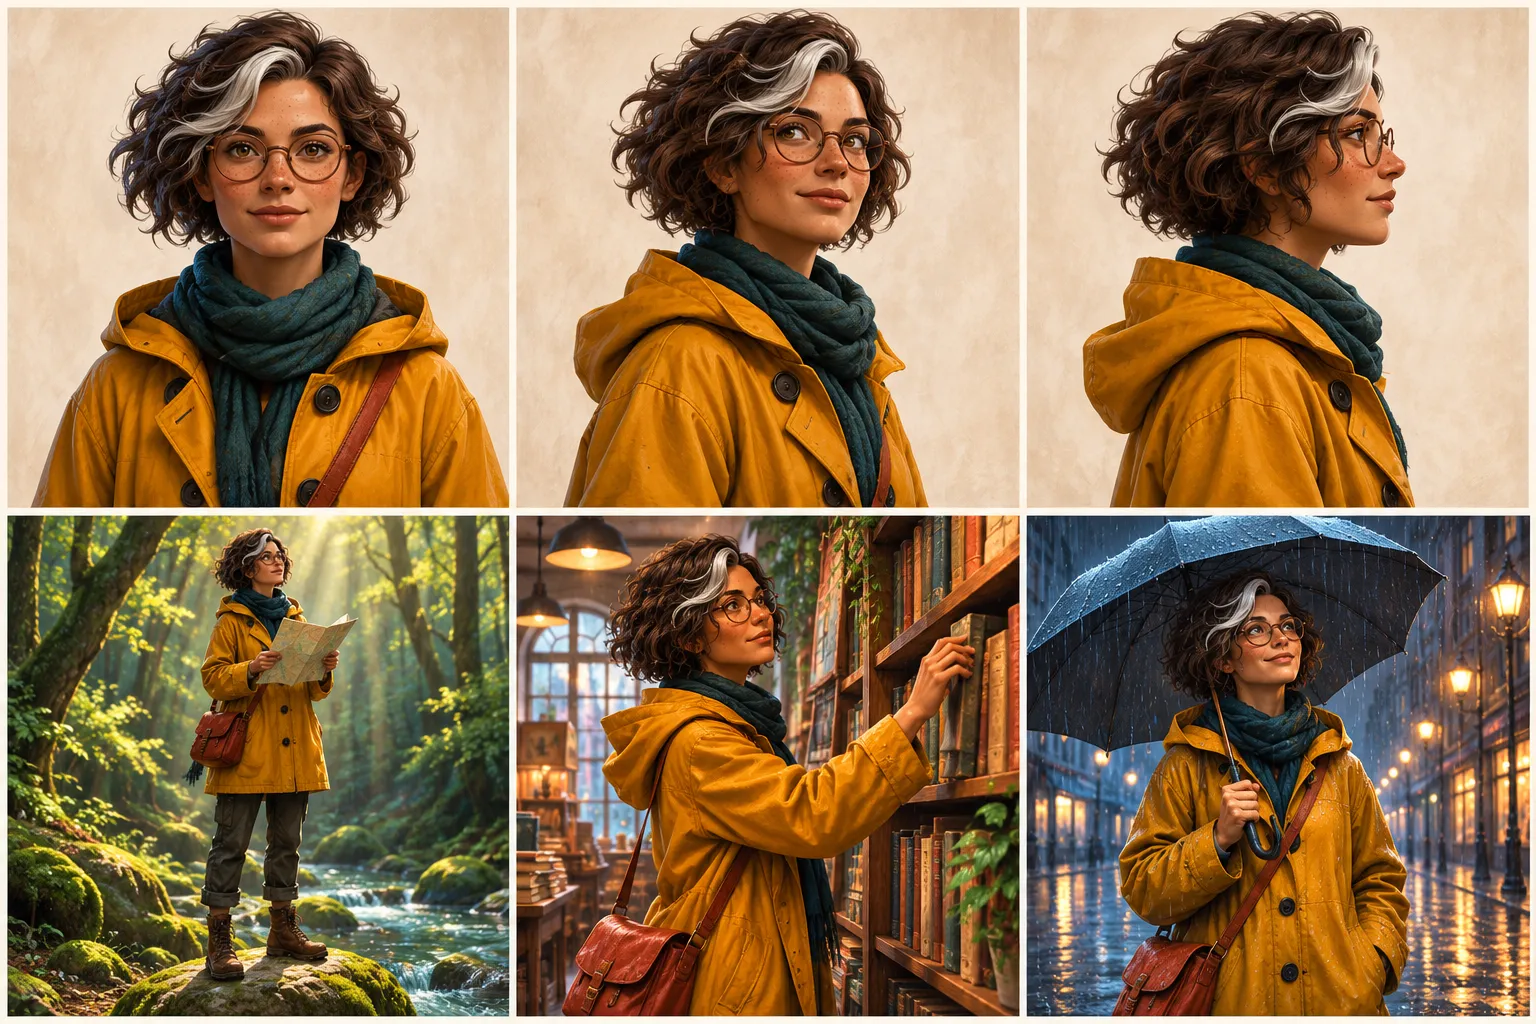
You finally create a character you love. She has a distinctive silver streak in her hair, round glasses and a yellow coat. In the next picture, the glasses change shape. In the third, her face looks like somebody else's. By scene four, even the coat has disappeared.
If you are making a comic, children's story, illustrated article or short video storyboard, this is more than a cosmetic problem. Readers need to recognize the same person from one scene to the next.
The solution is not to write “same character” more loudly. Start with a strong visual reference, decide which details must never change, and use the reference or image-editing controls your chosen generator actually provides. Then check each new image before making the next one.
The quick fix: five things to do before your next image
- Pick one approved picture of the character. Do not change the reference every time you generate.
- Write down five or six identifying features: face shape, hair, distinctive marks, glasses, outfit and a signature accessory.
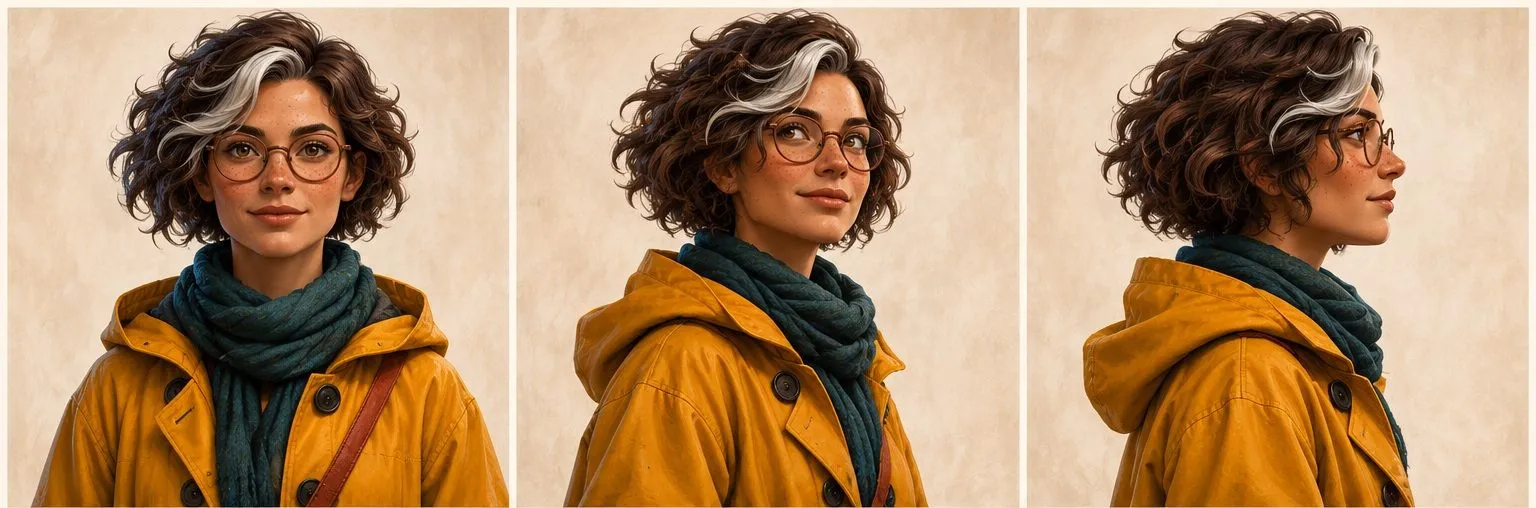
- Create a simple character sheet with front, three-quarter and side views whenever possible.
- Attach that reference using your tool's character, image or edit-reference feature. A text description alone is less reliable.
- Change the setting and action in the new prompt, but keep the identity description stable. Compare the result with your master image before accepting it.
The quick fix: five things to do before your next image
For a one-off picture, you may not need this process. For a recurring character, a few minutes of preparation can save many failed generations.
First, understand what “the same character” means
Character consistency has at least four layers. They are connected, but they are not interchangeable.
First, understand what “the same character” means
- Identity: the recognizable face, proportions, hairstyle and unique physical features.
- Design: clothing, glasses, bag, jewelry and other recurring details.
- Style: the visual treatment, such as painted animation, watercolor or cinematic photography.
- Continuity: what should logically stay the same within a sequence, including age, costume, injuries and carried objects.
First, understand what “the same character” means
A model can maintain a painted style while quietly changing the person's face. It can also preserve the face but redesign the coat. That is why a style reference by itself is not a dependable character reference.
A good workflow checks identity first, design second, and style and continuity after that.
Step 1. Create one character master, not ten competing versions
Choose an image with a clear face, readable silhouette and limited visual distractions. Prefer even lighting over heavy shadows. Avoid sunglasses hiding the eyes, hair covering half the face, or a tiny figure lost in a wide landscape.
If the first image is almost right, correct it before treating it as a master. Otherwise you will reproduce the same defects in every later scene.
Save that approved image as your original reference. Name it clearly, such as mira-master-v1.png. Keep an untouched copy. Create revisions deliberately: mira-master-v2.png should mean an approved design change, not just another random result.
For the article's example, we use a fictional character called Mira. Her visual identifiers are dark curly hair with a bright silver streak, amber-brown eyes, round glasses, soft freckles, a mustard-yellow coat, a teal scarf and a rust-red satchel. These specifics are a sample design, not a requirement to make every character this detailed.
Step 2. Make a character sheet with more than one angle
A single front-facing portrait tells the model less about the nose profile, jawline, hairstyle volume and clothing construction than several complementary views.
A useful starter sheet contains:
Step 2. Make a character sheet with more than one angle
- Front view: face, hairline, glasses and visible proportions.
- Three-quarter view: nose shape, cheekbones, hairstyle depth and how accessories sit.
- Side view: profile, chin, ears, coat collar and silhouette.
Step 2. Make a character sheet with more than one angle
For illustrated stories, add a full-body view if shoes, height and clothing proportions matter. For an expressive character, add two or three facial expressions. Keep these in a consistent art style and avoid changing the design between panels.
Treat a generated sheet as a proposal: inspect it manually. AI can draw three panels that look similar while still disagreeing on subtle anatomy. Correct or reject inconsistent panels before using the sheet as a visual standard.
Step 3. Write a short identity card
Alongside the images, maintain one brief description. It gives you a reference when you are working across different tools or returning to the project weeks later.
Example identity card:
Name: Mira (fictional character). Adult woman; short, dark curly bob with a single broad silver streak on her left-front side; warm amber-brown eyes; subtle freckles; fine round bronze glasses. Everyday costume: mustard-yellow hooded coat, dark teal knitted scarf, rust-red cross-body satchel. Visual style: richly textured painted 3D editorial illustration. Must remain recognizable across scenes.
Choose what is fixed and what can change. A winter coat might be optional in an indoor summer scene, but the distinctive silver streak and the structure of the face should remain. If the storyline requires a costume change, record the new outfit as an approved scene-specific variant.
Keep the card concise. A wall of adjectives is not a substitute for a clean reference image.
Step 4. Use the correct kind of reference in your generator
Different image tools use the word “reference” for different jobs. Check what the selected model and version actually support.
In ChatGPT Images, you can upload an existing picture and ask to edit it or create a new composition based on it. For careful continuity, describe exactly what should stay unchanged and what may change. Editing the approved image is often a useful starting point when a new scene is close to the previous one.
In Midjourney, the reference workflow depends on the version. The older --cref Character Reference belongs to V6. V7 uses Omni Reference with --oref; it accepts a character or object image and supports an adjustable reference weight. Midjourney's V8.X documentation directs users toward its Edit Model, which supports reference-image editing instead of the older Omni Reference flow. Do not copy instructions for one version into another without checking the selected model.
In Adobe Firefly, style references guide the look and feel; composition references guide structure and placement. Those controls are useful, but a matching style or layout alone does not establish an identical face. For repeat-character work, combine available reference tools with a stable master and manual review.
The important question is not “Which generator is best?” It is “Am I using a feature that preserves a subject, or only a feature that preserves a style?”
Step 5. Change the scene, not the identity
Here is a reusable prompt pattern. Replace the example details with your own character's approved identity card.
Reusable prompt template:
“Use the attached approved image of [CHARACTER] as the visual identity reference. Keep the face structure, hairstyle, distinctive marks, proportions and signature accessories consistent with the reference. New scene: [PLACE AND ACTION]. Camera: [FRAMING AND ANGLE]. Lighting: [LIGHT]. Keep the established [ART STYLE]. Only change [APPROVED CHANGES]. Do not introduce a new hairstyle, different glasses or unrequested costume changes.”
The reference image carries visual information that the text cannot fully express. The prompt tells the model which changes you want to make.
Copy-ready scene prompt 1: the forest
“Using the approved character reference of Mira, create a full-body painted 3D editorial illustration of her studying a folded map beside a shallow forest stream at golden hour. Preserve her recognizable face, short dark curls with the prominent silver streak, round bronze glasses, freckles, mustard coat, teal scarf and rust-red cross-body bag. Three-quarter camera view; luminous green forest; natural pose; no extra characters; no lettering.”
Copy-ready scene prompt 2: the bookshop
“Using the same approved Mira reference, show her inside an old bookshop reaching for a book on a high wooden shelf. Keep the same facial proportions, silver-streaked curls, glasses, yellow coat, teal scarf and red satchel. Medium shot, warm practical lamps, richly textured painted 3D illustration. Change only the environment and action; do not redesign her.”
Copy-ready scene prompt 3: a rainy city
“Use the approved Mira identity reference. Show her walking beneath a dark umbrella on a rain-soaked evening street with reflections in the pavement. Maintain her facial identity, curly hair with its silver streak, round glasses, freckles and signature outerwear and bag. Cinematic painted 3D look, three-quarter view, rain droplets and warm streetlights. Keep the character recognizable without copying the original background.”
These are starting prompts, not guaranteed outputs. The illustrations in this guide are conceptual examples of recurring design cues; they are not a controlled benchmark across multiple services.
Step 6. Inspect the image with a continuity checklist
Before approving a generated scene, compare it side by side with the master reference. Do not rely on memory alone.
Ask:
Step 6. Inspect the image with a continuity checklist
- Does the face read as the same person at first glance?
- Is the hairline or distinctive streak in the right place?
- Are the eyes, nose, jaw and glasses reasonably consistent?
- Are the coat color, scarf and accessory correct for this scene?
- Does the body scale make sense relative to previous scenes?
- Are there new details that the story did not authorize?
Step 6. Inspect the image with a continuity checklist
Mark each feature as Pass, Needs edit or Approved change. If the identity does not pass, do not make that image the next reference in your chain. Otherwise a small error can become permanent drift.
Step 7. Fix only what is wrong
When a result is 90 percent correct, a complete regeneration may destroy the good parts. Look for an edit, mask, fill or variation tool that can target the mismatch.
For example:
Step 7. Fix only what is wrong
- Wrong glasses: “Replace only the glasses with the thin round bronze frames from the reference. Keep the face, pose, clothing and background unchanged.”
- Missing silver streak: “Restore the broad silver streak at the front-left of Mira's dark curls; do not change the haircut or expression.”
- Altered coat: “Keep the subject's body and pose. Change the outer coat to the approved mustard-yellow design, preserving its hood and buttons.”
Step 7. Fix only what is wrong
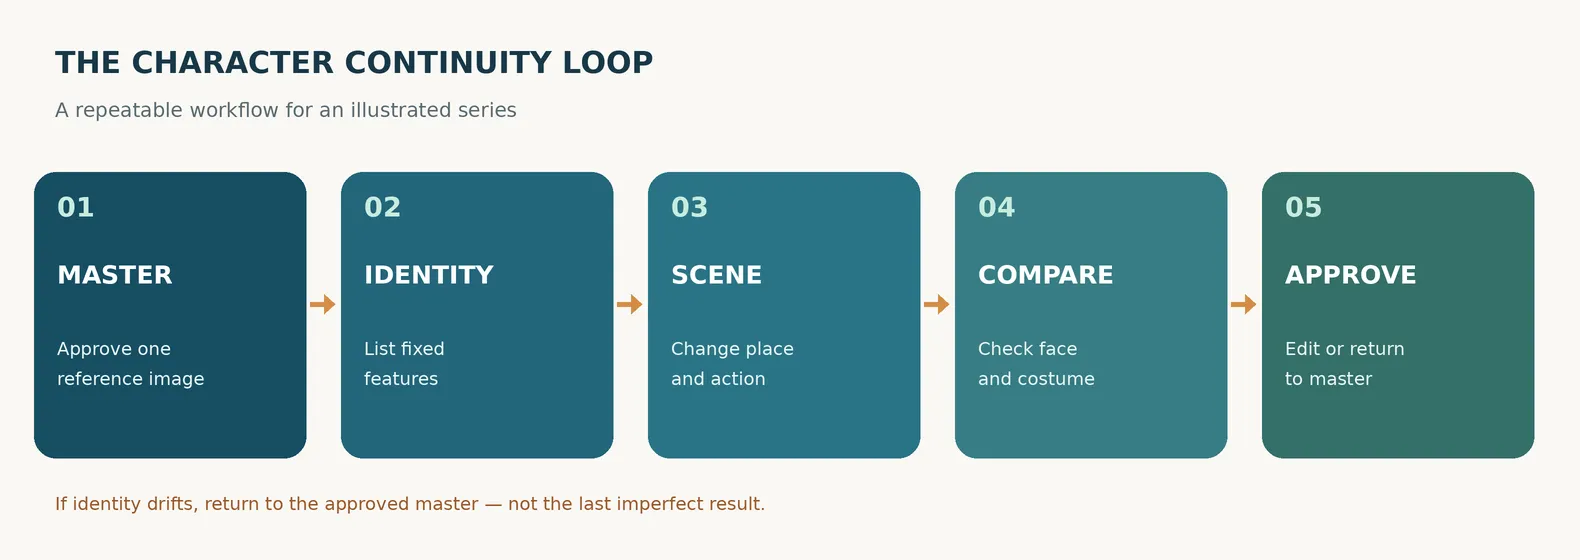
If the face itself has changed substantially, return to the approved master rather than trying to repair a long chain of inconsistent images. Save the corrected result only after checking it against the character sheet.
Step 8. Separate identity consistency from style consistency
Sometimes you want the same character in watercolor, comic art and 3D. Sometimes you want the same illustration style but a new character. These are different goals.
To keep identity while changing style, preserve your identity reference and name the new medium explicitly. Expect some interpretation changes, especially in stylized faces. Compare recognizable proportions and distinctive features rather than insisting that every brushstroke matches.
To keep style while changing the character, use a style reference when available. Do not mistake matching color palettes or brush textures for proof that the person is the same.
Composition references have a third role: controlling where elements appear. They can help match camera framing or pose, but are not a replacement for identity references.
Five mistakes that cause character drift
- Starting every image from text only. Reusing words can help, but a compatible visual reference usually provides more information.
- Changing multiple variables at once. If you change the pose, style, age, lighting and outfit together, it is harder to tell what caused the mismatch.
- Treating a random seed as an identity lock. A seed can help repeat aspects of a generation in certain tools, but it is not a universal character-memory system.
- Using a beautiful but unclear master portrait. Strong shadows or obscured facial features make continuity harder.
- Promoting a flawed result to the new master. This allows small inconsistencies to accumulate across an entire series.
What if two characters appear in one scene?
Begin with separate approved masters and distinct identity cards. When possible, use a tool that supports multiple references or an edit workflow where each subject can be controlled separately. Clearly state each person's position and clothing; avoid two near-identical descriptions that might get mixed together.
Check each person independently. A scene can look believable overall while swapping their accessories or facial details. If your tool cannot reliably preserve two identities at once, create the composition in stages or use an editor to refine it.
A simple production routine for a comic or illustrated series
Make a folder for each character containing the approved master, the reference sheet, the identity card and any authorized costume variants. Then number the scenes in story order and keep a lightweight continuity log.
For every scene, follow this sequence:
A simple production routine for a comic or illustrated series
- Start from the same approved identity reference.
- Write one scene-specific prompt and list any intended changes.
- Generate a small batch and choose the closest match.
- Compare it against the master using the same checklist.
- Make targeted edits or regenerate from the master if necessary.
- Save the approved scene and note which references and settings you used.
A simple production routine for a comic or illustrated series
You do not need expensive software or perfect file naming to begin. The important part is separating approved character identity from disposable experiments.
Can one prompt keep a character perfectly identical in every image?
No prompt can guarantee that across all generators, scenes and camera angles. A strong reference and editing workflow can improve continuity, but small differences may still occur. For strict commercial or sequential-art requirements, human review remains important.
Is using the same seed enough?
Usually not. Seed behavior differs by model and settings, and it should not be treated as a substitute for a character reference or careful editing. If a specific tool uses seeds for repeatability, test that behavior within the same model version and settings.
Do I need front, side and back views?
Not always. For a few portraits, a clear front and three-quarter view may be enough. For comics, animation-like scenes or full-body continuity, additional views can make the reference more informative.
Will a style reference preserve the same face?
Not necessarily. Style references primarily guide the overall visual look. Use a subject or image-edit reference when available, and compare the resulting character against your master.
Can I change a character's outfit without losing identity?
Yes, in principle. Declare that the outfit is the only intended change, keep the identity reference and check the face and body after generation. Save approved outfit variants separately instead of replacing the original character master.
Is it okay to base a character on a real person's photo?
Use photos you are permitted to use, respect privacy and obtain any consent necessary for the intended use. Do not imply that a fictional character is a real person's portrait without authorization. For an original illustrated project, a fully fictional reference can be simpler to manage.
The takeaway
For recurring AI-generated characters, consistency is a production process, not a magic phrase.
Approve one master. Build a reference sheet. Keep a short list of identity features. Use the right reference or edit control for your model. Change one scene at a time, check every result, and return to the master whenever the character begins to drift.
That is how a series of separate images starts to feel like one continuous world.
Listen & explore
- Midjourney — Omni Reference (external platform)
- Midjourney — Legacy Character Reference (external platform)
- Midjourney — Modifying Your Creations (external platform)
- Adobe Firefly — Style Reference Images (external platform)
- Adobe Firefly — Match Image Composition (external platform)
- OpenAI — Images in ChatGPT (external platform)