Articles / LORQAI
How to Make a Birthday Video With Photos and Music
Make a heartfelt birthday video from photos and music with a 75-second storyboard, easy steps for iMovie, Google Photos and Clipchamp, and practical export tips.
Introduction
A birthday video does not need elaborate effects to feel personal. Sometimes the most memorable moment is an old photograph, a familiar laugh, and a message that sounds like something only you would say.
The difficult part is usually not the software. It is deciding which pictures to include, how long to show them, what music fits, and how to turn a folder of memories into a story someone will want to watch.
This guide walks you through a simple birthday montage you can make on a phone or computer. You can follow the 75-second example exactly or adapt it for a parent, partner, friend, or child.
The quick version: make a birthday video in seven steps
- Pick 15–25 good photos and, if you have them, one or two short video clips.
- Choose where people will watch it: a phone held upright (9:16) or a TV/computer screen (16:9).
- Put your pictures into a simple story: opening, memories, a funny moment, personal message, final wish.
- Import everything into a video editor and place the photos in that order.
- Aim for roughly 2–4 seconds per photo as a starting point. Hold important images longer when necessary.
- Add music that you are allowed to use, lower it under spoken messages, and make the ending gentle rather than abrupt.
- Export a video, watch the actual file all the way through, and share it with the intended person.
The quick version: make a birthday video in seven steps
You do not need 25 photos, professional software, or a particular song. A thoughtful 45-second video can work better than a rushed three-minute slideshow.
Before editing: decide what kind of gift you are making
Ask yourself three questions. Who is this for? Where will they watch it? What should they feel when it ends?
For a private message to a close friend, warm and funny images may work best. For a family gathering, choose a format that works on a large screen. For a child, colorful, playful pacing may be appropriate. For a partner, a few meaningful memories can be stronger than dozens of random snapshots.
Choose one main emotional direction: joyful, nostalgic, playful, grateful, or gently romantic. You can include other feelings, but having a center makes editing easier.
Step 1. Collect photos without collecting everything
Create a temporary album or folder called Birthday Video. Start with 30–40 candidates, then narrow them to the best 15–25. If you only have eight wonderful photos, use eight.
Look for variety: a recognizable portrait, a shared experience, a small candid moment, a funny surprise, and one photo that says something about the person today. Mix close-ups with wider scenes so the video does not feel visually repetitive.
Avoid using five nearly identical group photos. Do not stretch low-resolution screenshots to fill a large frame. If a treasured picture is small, show it against a softly colored background rather than forcing it to fill the screen.
Remember that a birthday video may include other people's faces or children's photographs. Ask before sharing sensitive or personal images publicly; a private family gift has a different audience from an open social post.
Step 2. Choose the video shape before you begin
For a video mainly watched on a phone held vertically, start with a 9:16 portrait canvas. A common Full HD export is 1080 × 1920 pixels.
For a TV, projector, laptop, or traditional horizontal viewing, a 16:9 landscape canvas is usually more comfortable; Full HD is 1920 × 1080 pixels.
Square 1:1 can be useful for some layouts, but it is rarely the easiest default for a full-screen birthday video. The best ratio is the one that fits the viewing situation, not the one with the largest numbers.
If your original photos are horizontal and your video is vertical, choose deliberately between cropping and fitting. Cropping fills the screen but can cut out faces. Fitting preserves the whole picture but adds borders or a background. Check every important face near the edges.
Step 3. Follow this ready-made 75-second birthday storyboard
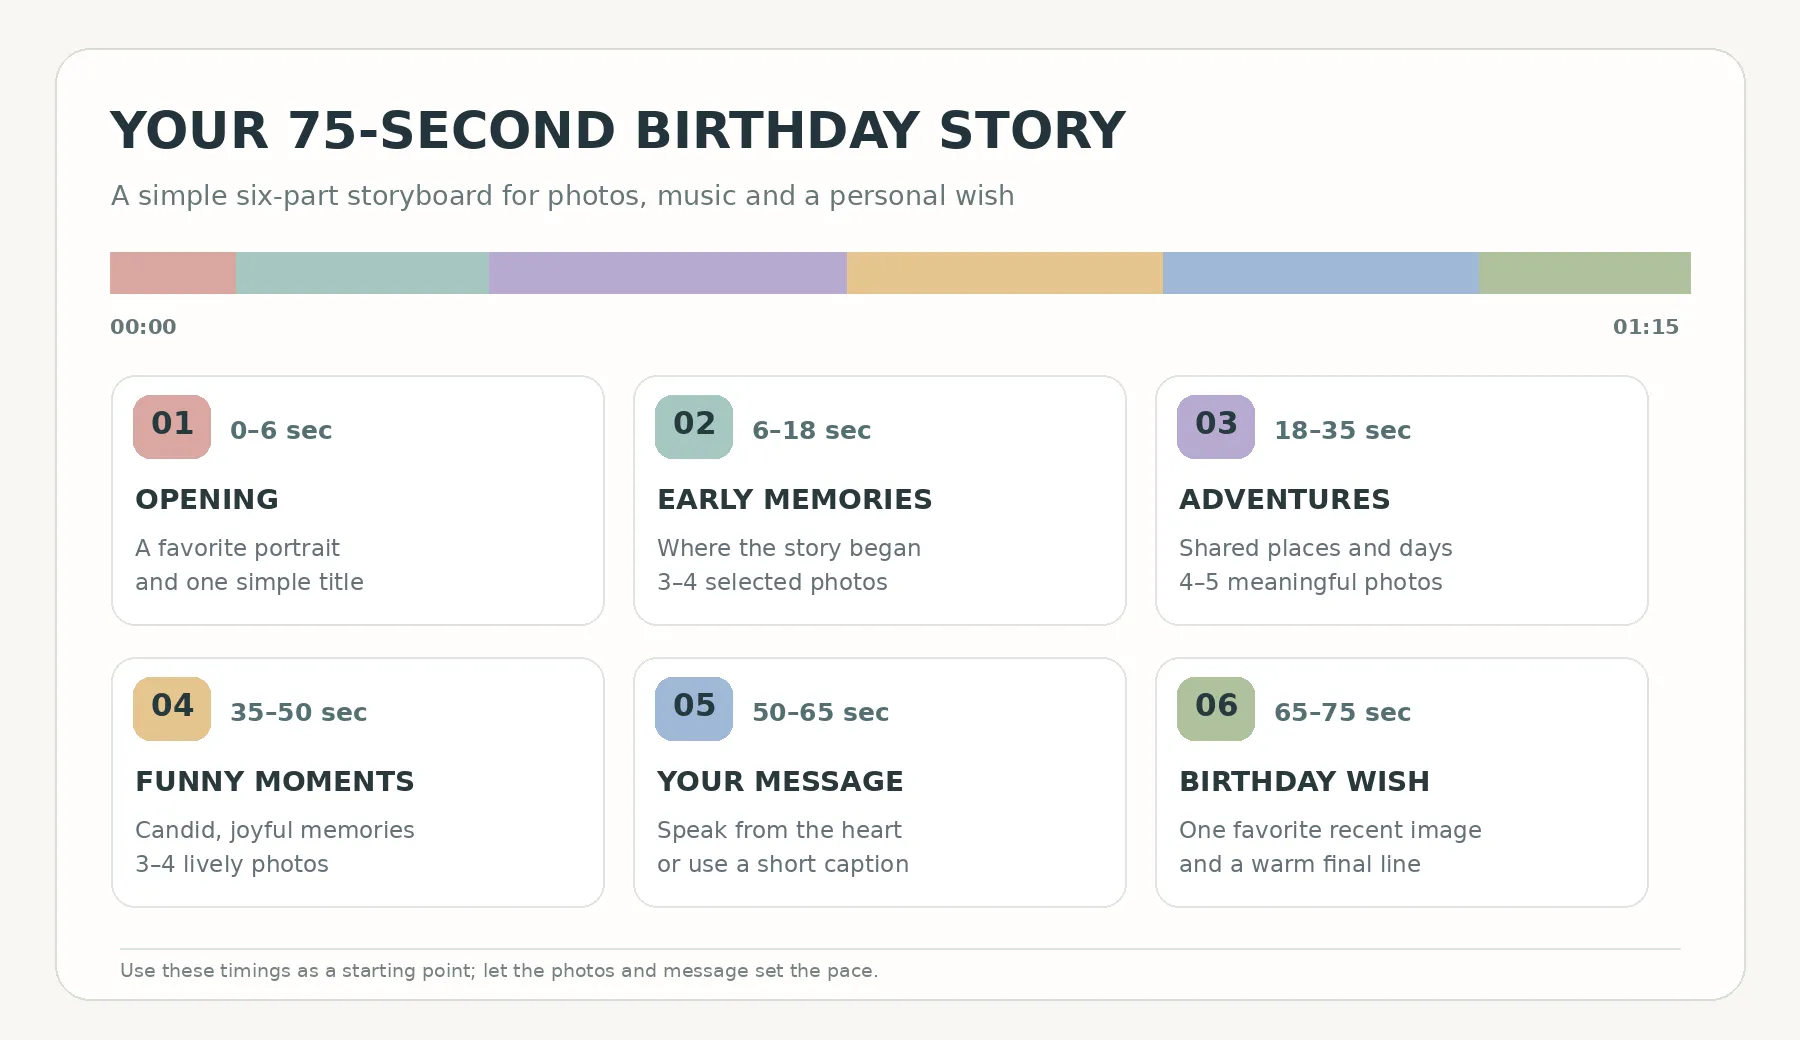
Here is one structure that makes a clear story without overwhelming the viewer. Treat the times as an editing example, not strict rules.
Step 3. Follow this ready-made 75-second birthday storyboard
- 0–6 seconds — OPENING: one favorite portrait and a short title such as “For all the moments that made us smile.”
- 6–18 seconds — EARLY MEMORIES: three or four photos that show where the story began.
- 18–35 seconds — SHARED ADVENTURES: four or five images from trips, celebrations, everyday discoveries, or shared hobbies.
- 35–50 seconds — THE FUNNY PART: three or four candid moments. Let one strong photo stay a little longer if it earns a smile.
- 50–65 seconds — THE PERSONAL MESSAGE: two or three images and a few words in your own voice or on screen.
- 65–75 seconds — THE ENDING: your favorite recent photo and “Happy Birthday” followed by one personal sentence.
Step 3. Follow this ready-made 75-second birthday storyboard
For example, a closing message could be: “The best part of every year is having you in it. Happy Birthday.” Replace this with words that are true for your relationship; a real memory is usually more moving than an elaborate quotation.
Step 4. Build the slideshow in an editor
You only need a tool that can arrange photos, set durations, add text, and put music underneath. The following routes are based on the manufacturers' documentation; menus can vary by device and app version.
On iPhone or Mac: use iMovie
Open iMovie and create a movie project. Add your photos and any short clips, then arrange them in your chosen order. Adjust each photo's duration and any automatic panning or zooming so the subject remains visible.
Add a title at the beginning and a short closing message. To add music, use the project's audio or soundtrack controls; choose a permitted track and adjust the level beneath spoken audio. Apple documents soundtrack, photo, title, and export features in iMovie.
When finished, export or share the movie as a video file and review it outside the editing screen. If you are using an iPhone, check the output resolution options available for that project.
On Android: use Google Photos Highlight video
In Google Photos, open the Create tab, choose Highlight video, and either start from a template or select your own photos and clips. Review the suggested sequence, then change the order, music, or text where the controls allow.
Save the video and watch it from beginning to end. Google notes that Highlight video availability can depend on the device, and some included music has personal, non-commercial use restrictions. If your phone does not offer the feature or you need finer control over timing, use another editor with a photo timeline.
On Windows: use Microsoft Clipchamp
Open Clipchamp, start a video project, and import your photos into the media area. Drag them onto the timeline in story order. Adjust how long each picture stays on screen, choose your canvas ratio, and add titles.
Use the audio controls to import a track you can legally use or select a suitable library item whose terms fit your project. Lower the music volume and add a short fade-out. Microsoft documents importing photos, placing audio on the timeline, and exporting to MP4.
These are examples, not a ranking of editors. Use whichever tool you already know well enough to complete the project.
Step 5. Make the photos feel alive without distracting effects
A little movement can help static images, but more motion is not necessarily better.
Try a slow zoom toward a face, a gentle pan across a landscape image, or a simple dissolve between chapters. Keep the direction and speed natural. Avoid changing movement direction at every cut.
Use transitions sparingly. A clean cut can work beautifully with the beat of the music. A short dissolve can soften the change between quiet memories. Constant spins, flashes, and complex transitions often make it harder to appreciate the photographs.
Give important text enough time to be read. On a phone, one short sentence is usually kinder than a full paragraph. Use high contrast and keep the text away from screen edges.
Step 6. Choose the music carefully—and check the rights
Music shapes the feeling of a montage. A warm acoustic instrumental can suit nostalgic pictures; a bright rhythmic track can support a playful birthday; a gentle piano theme can leave space for a spoken message.
Choose the mood first, then edit the photos to the music's natural phrases. You do not have to cut on every beat. If there is a voice message, make the music quieter during those words and bring it back afterward.
The important distinction is between being able to listen to a song and having permission to combine it with a video and share the result. A streaming subscription or purchased download does not automatically grant the rights to publish a video using that recording. Some built-in editor tracks are licensed only for particular uses or platforms. Check the applicable terms, especially if you plan to post publicly or use the video commercially.
If you are unsure, use music you created and have the necessary rights to use, a properly licensed track for the intended video use, or eligible audio from the editor's library under its stated conditions. Merely crediting the artist is not a substitute for permission.
Step 7. Export, test, and share the finished video
A practical starting point for many birthday videos is an MP4 in 1080p, if your editor and device support it. For a portrait video that usually means 1080 × 1920; for landscape, 1920 × 1080.
Do not force 4K just because it is available. The original photos, the destination screen, and your upload limits matter more. Export once, then open the actual saved file outside the editor.
Check the first second, every title, each cropped face, the music level, and the last two seconds. Listen with headphones and through a phone speaker: a voice message that sounds clear on headphones may be hard to hear on a small speaker.
Send the file privately if the images or messages are personal. If you publish it on a platform, check the destination's audio and privacy rules separately. Keep a backup of the exported video and, if possible, the editable project.
Five mistakes that make a birthday montage feel less personal
- TOO MANY PHOTOS: a long video with repetitive images can weaken the best moments. Choose favorites rather than including everything.
- TINY TEXT: lengthy messages disappear before a viewer can finish reading them. Use a short line and give it time.
- RANDOM MUSIC: a loud track or abrupt change in mood can fight the pictures. Choose one emotional direction and balance the sound.
- CROPPED FACES: auto-fill may cut off someone important. Inspect every frame after choosing portrait or landscape.
- NO REAL ENDING: the video simply stops. Give it a final image, a personal wish, and a gentle audio fade.
A simple checklist before you send it
- The recipient is unmistakably the heart of the video.
- The first five seconds make sense without explanation.
- The photos tell a clear story rather than appearing at random.
- Every face and important detail is visible.
- Text is readable on a phone.
- The music is not louder than the spoken message.
- You have the necessary permission to use the music and share the images as intended.
- The exported file plays correctly from start to finish.
- The final frame feels like an ending.
How many photos should I use for a one-minute birthday video?
There is no fixed number. About 12–20 photos can be a reasonable starting point if each stays up for roughly 2–4 seconds and you leave room for a title, message, and ending. Adjust based on the story and any video clips.
Can I make a birthday video without paying for editing software?
Yes, depending on your device and needs. iMovie, Google Photos Highlight video, and Clipchamp offer ways to assemble photos and audio, though feature availability, subscriptions, stock-media rights, and export options can vary. Check what your current version provides before choosing premium assets.
Is a vertical or horizontal birthday video better?
Choose vertical if the main audience will watch on a phone held upright. Choose horizontal for a TV, projector, or laptop. Decide before editing so you can check cropping early.
Can I use a famous birthday song from my music app?
Not automatically for publication. Purchasing or streaming a song does not, by itself, grant permission to synchronize the recording with a video and distribute it. Use audio that is licensed for your actual intended use.
What if I only have old, low-quality photos?
Keep them at a comfortable viewing size. Use a neutral or softly blurred background instead of stretching them until faces look blocky. A meaningful old photograph is worth including even when it is not technically perfect.
Should I add a voice message or just text?
Either works. A short voice message often adds warmth, but only if it can be heard clearly. If recording is awkward, a sincere single sentence on screen is enough.
The real secret is the story
You do not need a complicated editor to make someone feel remembered. Start with a few photographs worth keeping, arrange them with intention, let the music support rather than overpower them, and end with words that only you could have chosen.
A birthday video works best when it feels like a small piece of someone's life—not a slideshow trying to prove how many effects your editor has.
Listen & explore
- Apple Support — How to make your own movie with iMovie (external platform)
- Google Photos Help — Make creations with Google Photos (external platform)
- Microsoft Support — How to add images to video (external platform)
- Microsoft Support — How to add stock music and audio (external platform)
- Microsoft Support — Exporting and saving a video (external platform)
- YouTube Help — Common copyright myths (external platform)