Articles / LORQAI
Pinterest Image Size Guide: How to Avoid Cropping and Blur
Learn the best Pinterest image Pin dimensions, how to fit wide or square artwork into a 2:3 canvas, which formats to export, and how to fix cropping or blurry previews.
The quick answer
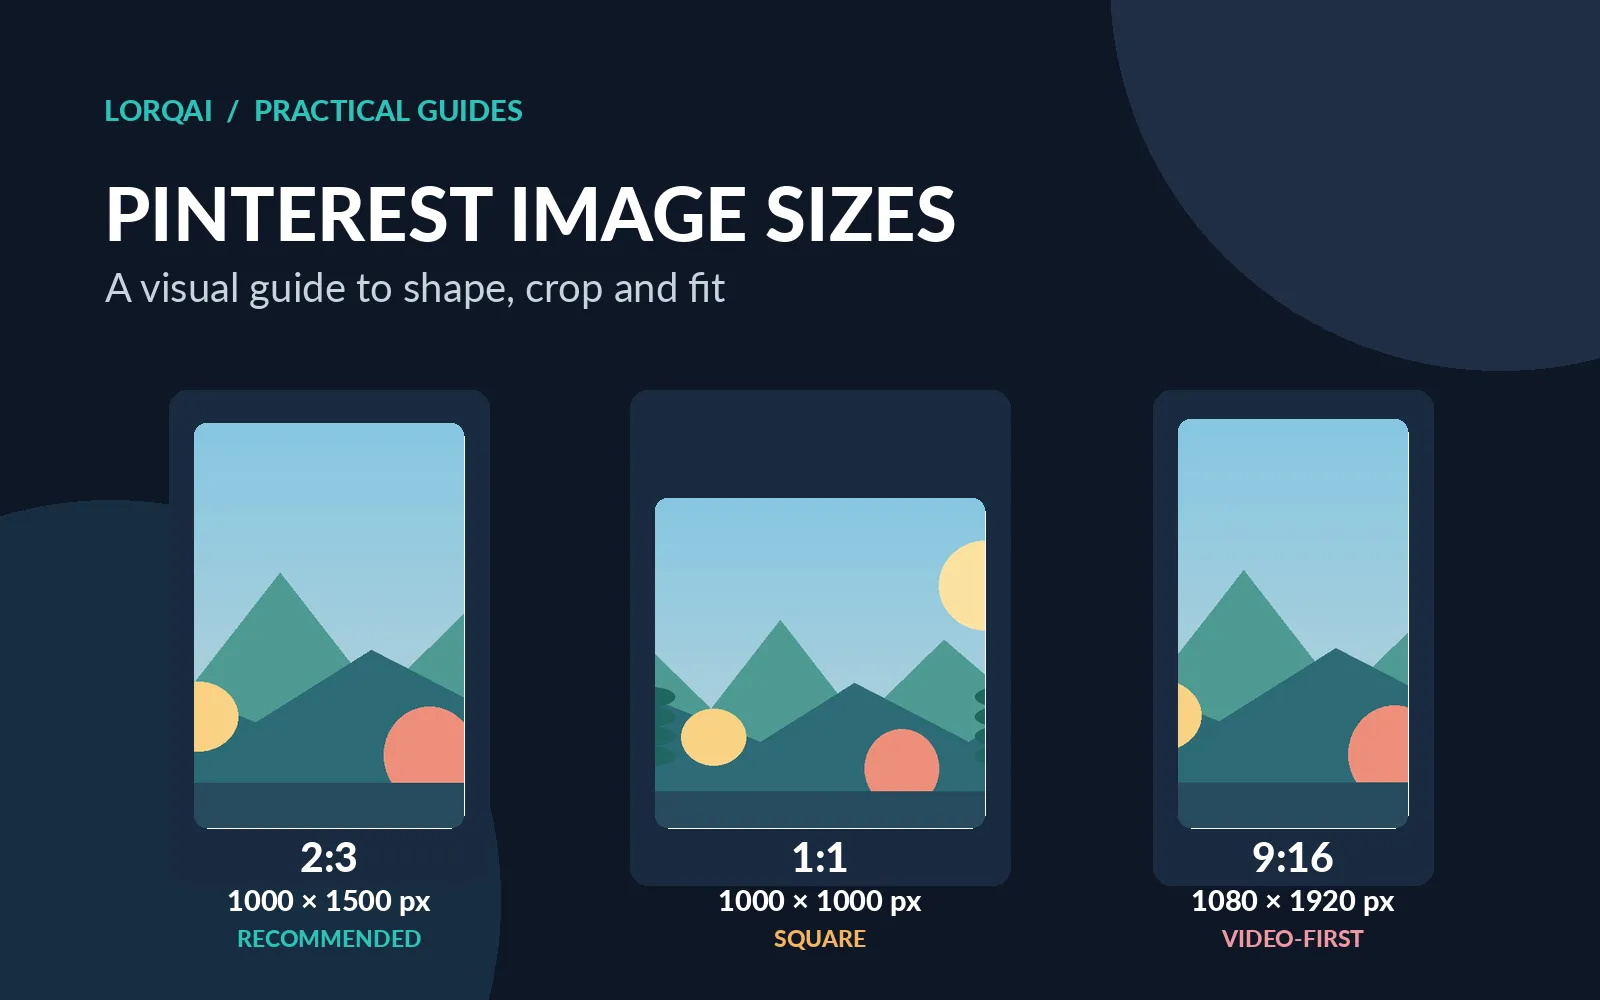
For a standard Pinterest image Pin, start with a vertical canvas measuring 1000 × 1500 pixels. That is a 2:3 aspect ratio: for every two units of width, there are three units of height. Pinterest recommends this shape because it works well in the feed. You can post other shapes, but unusually tall images may be cropped in feed previews.
Save a photographic Pin as a good-quality JPEG, or use PNG when the design has fine text, diagrams or sharp flat-color edges. Pinterest's current image Pin guide also accepts BMP, TIFF and WebP. On the website, the official maximum image file size is 20 MB; mobile upload guidance differs. These are Pinterest upload limits, not instructions to make a file that large.
If your Pin looks cropped or blurry, do not immediately increase its DPI. First check its pixel dimensions, whether the design was stretched, and whether the problem appears in the image itself or only in a preview. The practical steps below cover each case.
Try this five-step fix first
- Open the original image and check its pixel width and height.
- Make a new 1000 × 1500 px canvas for an ordinary vertical image Pin.
- Place the original with Fit (whole image, possibly with borders) or Crop/Fill (edge areas deliberately removed). Never stretch it out of proportion.
- Keep important details and any readable text away from the edges. Export a clean JPEG or PNG and inspect the saved file at full size.
- Upload, review the Pin in the editor and after publishing, and compare its full view with the feed preview. Check the destination link before publishing.
The best size for an ordinary Pinterest image Pin
The simplest starting point is 1000 × 1500 px (2:3). It is a recommendation, not the only image size Pinterest accepts. You can use a larger file with exactly the same ratio, such as 1200 × 1800 px; the ratio matters for the composition, while the actual pixel count affects available detail.
A square 1000 × 1000 px image is a different shape and can be used for some designs, but it occupies less vertical room than a 2:3 image. A 1080 × 1920 px canvas is 9:16 and is recommended by Pinterest for full-screen video, not as the default for ordinary still-image Pins. Reusing a 9:16 video cover as a static Pin without checking the preview can leave key elements out of view.
Image size cheat sheet: choose by purpose
- Standard static image Pin — 2:3 — example 1000 × 1500 px — best default for a new vertical image Pin.
- Square design — 1:1 — example 1000 × 1000 px — a valid alternative shape when your artwork is square; preview the resulting feed layout.
- Tall 4:5 design — 4:5 — example 1000 × 1250 px — another portrait proportion, but not Pinterest's preferred standard ratio.
- Full-screen video — 9:16 — example 1080 × 1920 px — a separate video use case; do not assume a tall image will show uncut in every feed surface.
- Landscape artwork — no one universally safe width-to-height rule — place it inside a 2:3 design if you want full control of how the entire piece is presented.
How to check the shape of your existing image
Divide the pixel width by the pixel height. A 1000 × 1500 image is 1000 ÷ 1500 = 0.667, which corresponds to 2:3. A 1200 × 1800 image has the same ratio; it simply contains more pixels. A square 1200 × 1200 image has a ratio of 1:1.
When you change the shape of an image, something has to give: either you crop away some edges, add space around it, or distort the picture. The third option almost never looks professional.
Why your Pinterest Pin gets cropped
A preview and the full image do not always use exactly the same visible area. The platform may crop a very tall Pin in some feed placements, while an editor or design tool may crop it intentionally to fit a new canvas. These are different events: the first is display behavior, the second changes the creative you export.
The easiest way to diagnose it is to open the image you saved before upload. If the subject is already missing, the crop happened in your editor. If the exported file is complete but a feed preview shows only part of it, inspect the Pin in full view before deciding that the upload destroyed your artwork.
Four common cropping mistakes
- Putting a wide landscape illustration directly into a narrow portrait template and accepting an automatic center crop.
- Using a very tall 9:16 design for a static image and assuming every Pinterest feed placement will reveal its full height.
- Keeping the headline, face or main subject right at an outer edge where previews and interface elements may reduce visibility.
- Mistaking a cropped preview for the actual stored image without opening the Pin in full view.
Fit versus Fill: the choice that solves most cropping problems
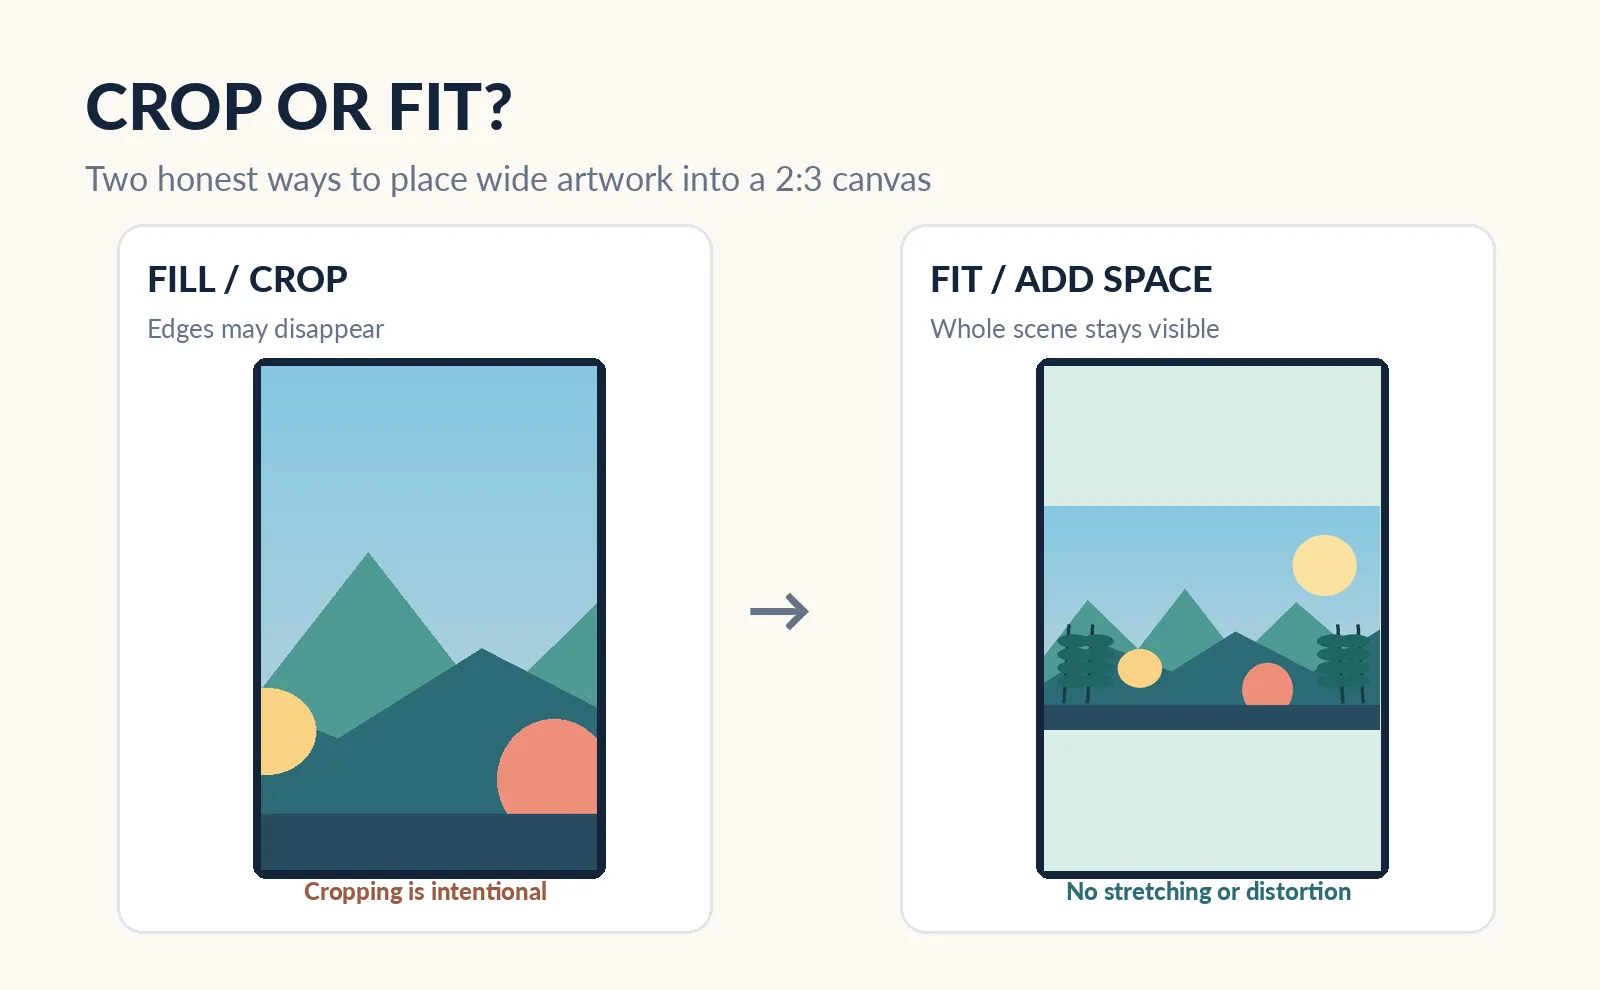
Fit means the whole original image remains visible. If its proportions do not match the 2:3 canvas, you will have unused space. Fill that space with a neutral background, a color pulled from the artwork or a deliberate design treatment. This is useful for posters, illustrations, paintings and photographs where cutting off the edges would ruin the composition.
Fill or Crop means the image covers the entire 2:3 canvas. The tool removes whatever falls outside. This can work beautifully for a photograph with generous space around the subject. Move the cropping window until the person, object or detail that matters stays visible.
Stretching changes an image's width and height independently. Circles become ovals and people or objects look distorted. Do not use Stretch as a shortcut for turning a landscape picture into a vertical Pin.
Example: turn a wide photograph into a vertical Pin
Suppose your image is 1600 × 900 px. That is a wide 16:9 photograph. If you set it to Fill a 1000 × 1500 px canvas, the crop will remove a large amount from the left and right. That may cut off a subject or an important part of a scene.
For a picture where the whole frame matters, create a 1000 × 1500 px canvas, resize the wide picture proportionally until it fits within the width, center it, then design the empty space above and below. Add a short headline or a small color block there if appropriate. Now you have a portrait Pin without sacrificing the artwork.
For a photograph where the center is the focus, you may prefer Fill. Preview it before exporting. There is no universally correct choice: what matters is whether your composition survives.
Example: reuse square artwork without distorting it
Imagine a square illustration measuring 1200 × 1200 px. If you Fit it inside a 1000 × 1500 px canvas, it can fill the width and leave about 250 px of vertical room above and below. The illustration remains square and recognizable.
That extra room can support a short title or simply remain clean negative space. If you crop the square artwork to fill the entire 2:3 area instead, you will lose part of its sides. Decide which result tells the story better before you upload.
How to keep a Pin sharp instead of blurry
Start with a high-quality original. Exporting a 400 × 600 image as 1000 × 1500 will not automatically recreate missing detail. The new file may have more pixels, but it will still be an enlarged version of a small source.
Use JPEG for most photographs, preferably from the original image or master editing file. Repeatedly saving and recompressing the same JPEG can damage small details. PNG is often a better choice for screenshots, typography and diagrams because it preserves sharp edges without JPEG-style artifacts. Pinterest also accepts other image types, but JPEG and PNG are widely supported starting points.
Make text large enough to read on a phone screen. A headline that looks elegant on a desktop canvas can become unreadable when the Pin is displayed small in a grid. Inspect your design at both full size and at a narrow phone-like preview. A crisp image with microscopic lettering is still a poor reading experience.
File size in MB is not the same as resolution in pixels. A very large file can contain few useful details, while a well-exported smaller file can look excellent. Focus on the actual image, not on making the upload as heavy as possible.
Before uploading: seven export checks
- The image is the intended shape, ideally 2:3 for a standard image Pin.
- The file has enough genuine pixel detail; you did not upscale a tiny screenshot.
- The main subject is visible in your chosen Fit or Fill layout.
- Any text is readable at mobile-preview size and not placed dangerously close to edges.
- The file is a supported format; JPEG or PNG is usually a simple choice.
- You opened the exported file and checked that lines, text and details still look good.
- The title, description, board and destination link match what a visitor will actually see.
How to upload an image Pin on desktop
Sign in to Pinterest and choose Create, then Create Pin (the location of the control can vary by account type or interface). Upload your exported image, or drag it into the editor.
Add a descriptive title and a useful description written for people, not a string of repeated keywords. Choose a relevant board and add the correct destination link if you have a page where people can learn more. Pinterest's current creation flow also supports related-topic tags and an AI-modified disclosure control where appropriate.
Use the editor's preview or image editing option to check the crop. Finish the Pin only when the composition, text and link are correct. After publishing, inspect the Pin itself and a feed view if available. Interface steps may vary between desktop and mobile versions.
If it still looks wrong after upload
- If the Pin is cropped: compare the exported file and the full Pin view; make a 2:3 Fit version if the original is too tall or too wide.
- If text is cut off: move it further into the composition and preview on a narrow screen.
- If the image is blurry: compare the original, exported file and uploaded copy; avoid upscaling and overly aggressive JPEG compression.
- If colors look different: check your export workflow, image preview and original file rather than relying on a single screen. Display settings can affect the appearance of color.
- If people click but cannot find what was promised: make sure the destination page closely matches the Pin's subject and is accessible on mobile.
A useful Pin is a doorway, not the destination
If you publish digital art, tutorials or visual stories, let the Pin make one clear promise and link to a page that fulfills it. A Pin called “How to protect a painting from cropping” should not send readers to an unrelated homepage with no explanation. A clear headline, relevant image, descriptive link and helpful destination create a coherent experience.
Pinterest says distribution depends on many factors, including engagement, context and relevance. Correct dimensions help presentation, but they do not guarantee reach, clicks or search rankings. Test your images, watch which topics people engage with, and improve the material itself rather than chasing a supposedly magic size.
FAQ: Is 1000 × 1500 required?
No. It is Pinterest's recommended default size for a standard vertical image Pin, not the only allowed size. Other resolutions at a 2:3 ratio can work; preview how Pinterest displays your particular file.
FAQ: Can I upload square or 9:16 images?
Yes, Pinterest supports different image shapes, but they do not all receive the same presentation. Square artwork can be a reasonable choice if its composition requires it. The 9:16 ratio is especially associated with full-screen videos; for ordinary image Pins, start with 2:3 when possible.
FAQ: Which file format works best?
JPEG is a practical choice for photographs. PNG often works better for fine lettering, diagrams and hard edges. Pinterest's image Pin guide lists BMP, JPEG, PNG, TIFF and WebP as supported formats. Choose based on image content and how the exported file looks.
FAQ: Is the Pinterest image upload limit 20 MB?
Pinterest's current organic image Pin specs list 20 MB as the maximum on the web. Mobile guidance is different, and requirements for advertisements or other products may also differ. Always consult the relevant official upload guidance for your workflow instead of applying an ad limit to every kind of Pin.
FAQ: Why is my image clear on my computer but blurry in the feed?
You may be seeing a small preview, or the service may display a resized version. Open the Pin fully first. If the exported file itself is sharp, review how it appears at the size used in the feed. Enlarging a low-resolution image or using tiny text can also cause an apparently blurry result.
FAQ: How do I upload a wide artwork without losing its edges?
Create a vertical 2:3 canvas and use Fit. Keep the original image's proportions, then intentionally design the remaining space with a background or title. Do not stretch the artwork or automatically accept an aggressive center crop.
The one rule worth remembering
A strong Pinterest image Pin starts with a simple decision: keep the important part of your image visible. For most static Pins, design around a 2:3 canvas and 1000 × 1500 px as a sensible starting point. Use Fit when you must preserve the whole image, Crop when a tighter composition improves it, and always inspect the exported file before posting.
Format alone will not bring an audience. Clarity, relevance and a genuinely useful destination matter just as much.
Listen & explore
- Pinterest Help: Review Pin specifications (external platform)
- Pinterest Help: Create a Pin from an image or video (external platform)
- Pinterest Help: Design a Pin (external platform)
- Pinterest Business Help: Pin performance and distribution (external platform)
- Pinterest Business Help: Review advertisement specifications (external platform)